Using git to edit and publish code#
Andrew Delman, 2024-09-29
For newcomers to Github, this tutorial covers some of the basic git commands that you can use to manage code changes in a given repository, and publish those changes. To illustrate this process, we will make some “test” changes to the example tutorial notebook. For further reference, the Atlassian Git tutorial is a good resource.
Getting ready to make changes to a repo
Making changes in a git repo
Updating your repo with changes from upstream
Sharing your changes with the upstream repo
Getting ready to make changes to a repo#
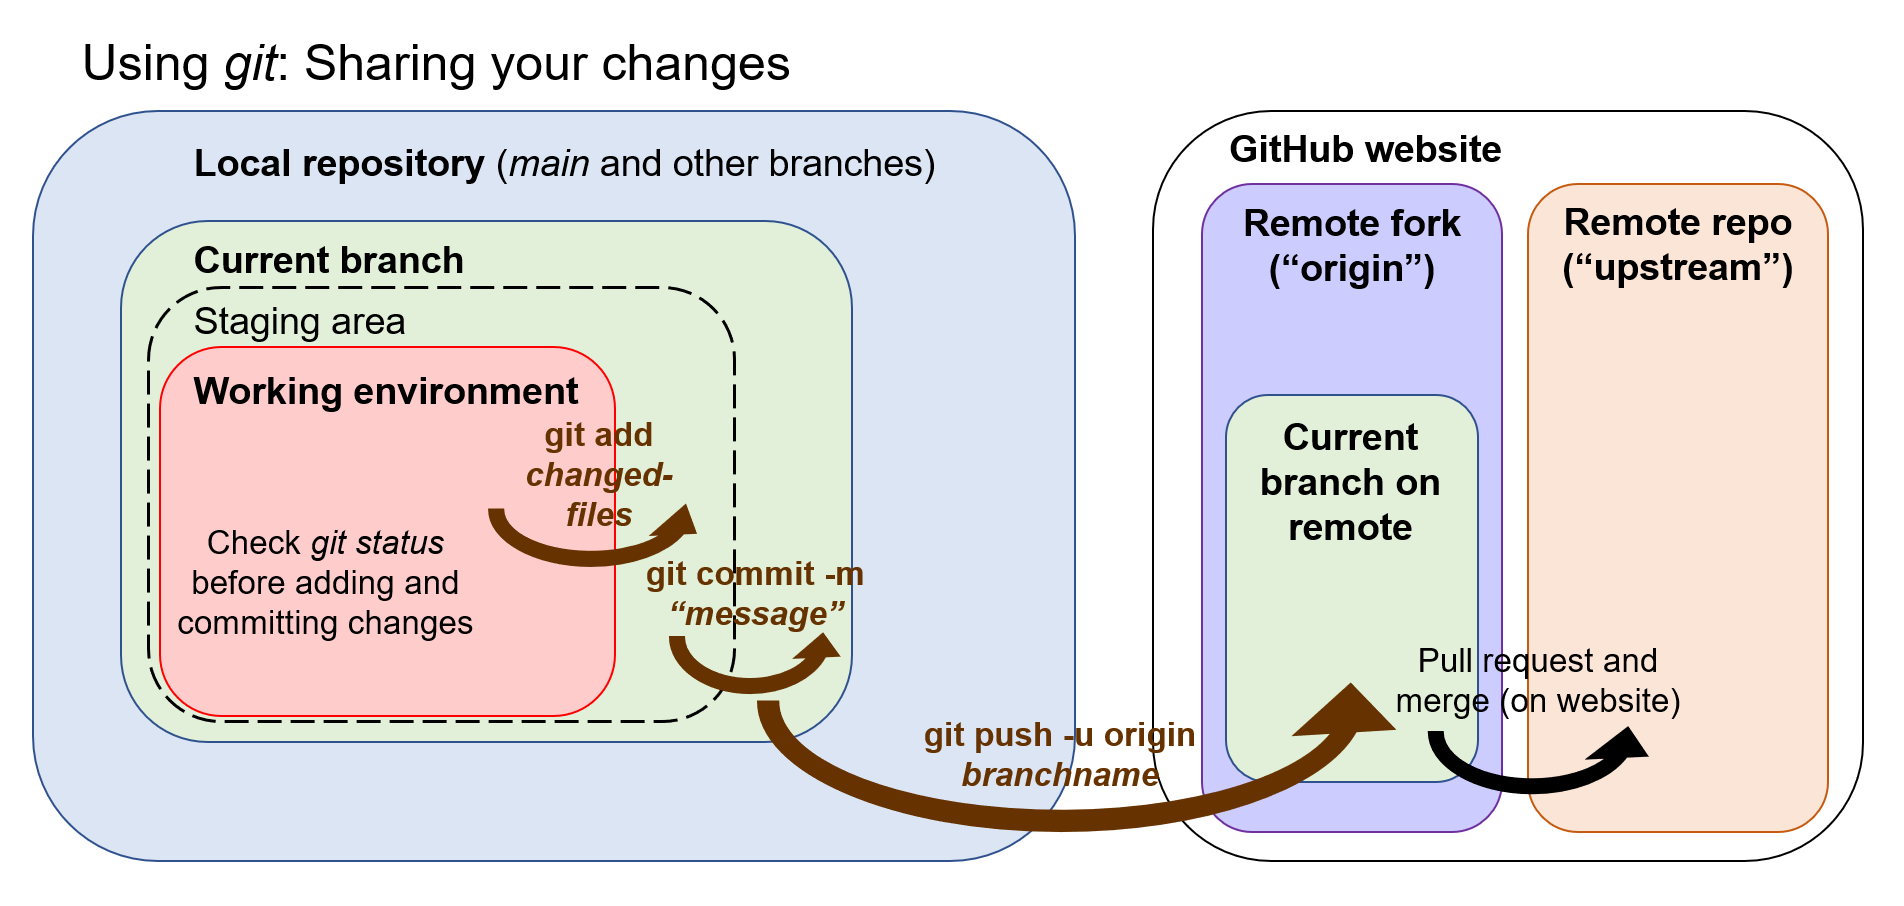
The following schematic illustrates the steps that a user might take before making code changes that will be contributed back to the shared remote repository.
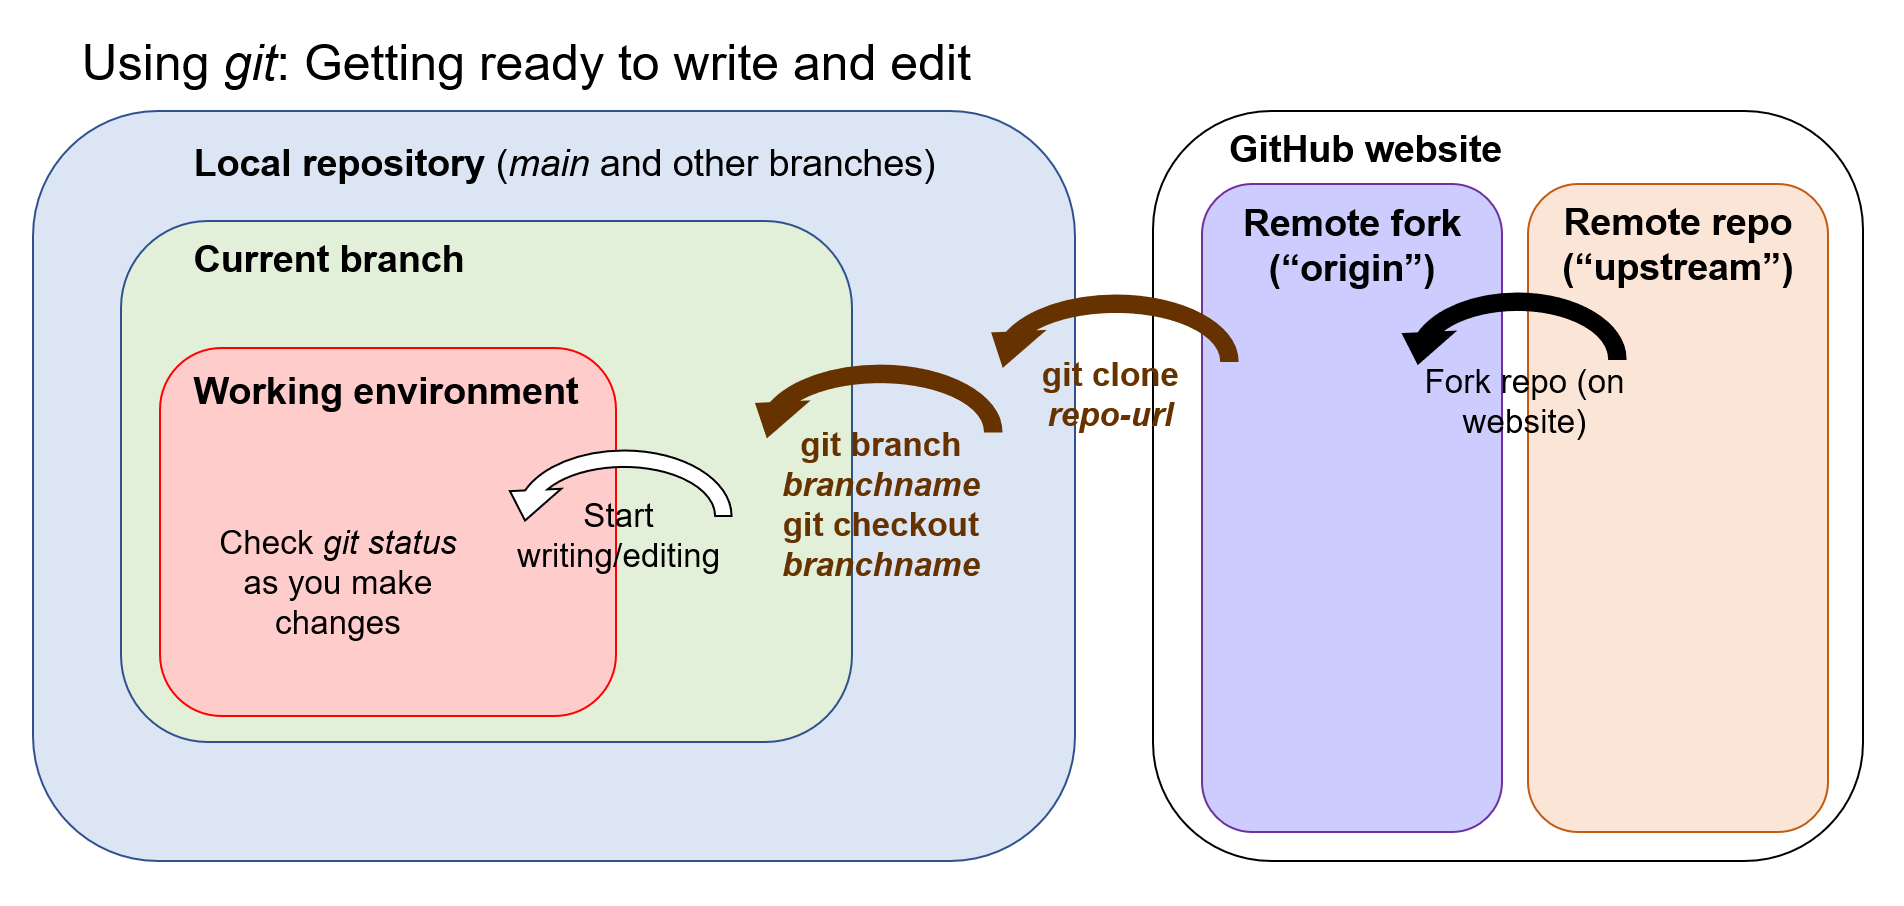
In the previous tutorial the setup included the first two steps: (1) forking the repo so that you have an individually-owned repo to base your changes, and (2) cloning that repo so you have it on your local machine.
Creating a branch#
When writing or revising code (including Jupyter notebooks), it is a good practice to first create a branch. Each branch is a place where you make a coherent set of changes to a repo (e.g., writing a new notebook, adding a new feature to your code). This helps organize contributions when they are merged into the remote repo. Let’s open a terminal window in JupyterHub and navigate to the ecco-2024 directory/repo: cd ~/ecco-2024. We can make sure we are in the ecco-2024 repo by running the command:
(notebook) jovyan@jupyter-adelman:~/ecco-2024$ git status

On branch main
Your branch is up to date with 'origin/main'.

nothing to commit, working tree clean
This confirms that you are in the main branch of the ecco-2024 repository, and any changes you make will be implemented in that branch. But now we create a “topic” branch called test_changes:
(notebook) jovyan@jupyter-adelman:~/ecco-2024$ git branch test_changes
(notebook) jovyan@jupyter-adelman:~/ecco-2024$ git branch -a
  git_tutorial
* main
  test_changes
  remotes/origin/HEAD -> origin/main
  remotes/origin/main
The last command git branch -a shows all the branches that git is aware of for this repository, on both local and remote repos. We can see the new branch created in this list.
Note that a quick check of git status shows that you are not in the new branch yet, and any changes you make will still be associated with the main branch. So let’s move to the new branch using git checkout.
(notebook) jovyan@jupyter-adelman:~/ecco-2024$ git status
On branch main
Your branch is ahead of 'origin/main' by 2 commits.
  (use "git push" to publish your local commits)

nothing to commit, working tree clean

(notebook) jovyan@jupyter-adelman:~/ecco-2024$ git checkout test_changes
Switched to branch 'test_changes'
(notebook) jovyan@jupyter-adelman:~/ecco-2024$ git status
On branch test_changes
nothing to commit, working tree clean
We have confirmed that we are now working in the test_changes branch.
[!NOTE] It’s a good idea to check
git statusfrequently while working in your repo, and definitely before you add or commit any changes you have made.git statuswill quickly tell you what branch you are working in and which files have changes pending, or are not yet tracked by git.
Making changes in a git repo#
Change the example notebook#
Now we’re going to make a small change to the example/tutorial-notebook.ipynb notebook. In the JupyterHub left sidebar, navigate to the ecco-2024/book/tutorials/example folder if you are not there already, and double-click on tutorial-notebook.ipynb to open it.
Scroll down to the cell with bbox = [-108.3, 39.2, -107.8, 38.8] and change the bounding box limits to bbox = [-118.2, 34.2, -118.1, 34.1] so that the box is more or less centered on Pasadena, CA. Run the notebook at least through the Interactive visualization section to confirm this change. Save your changes (using Ctrl-S or equivalent).
Move between branches#
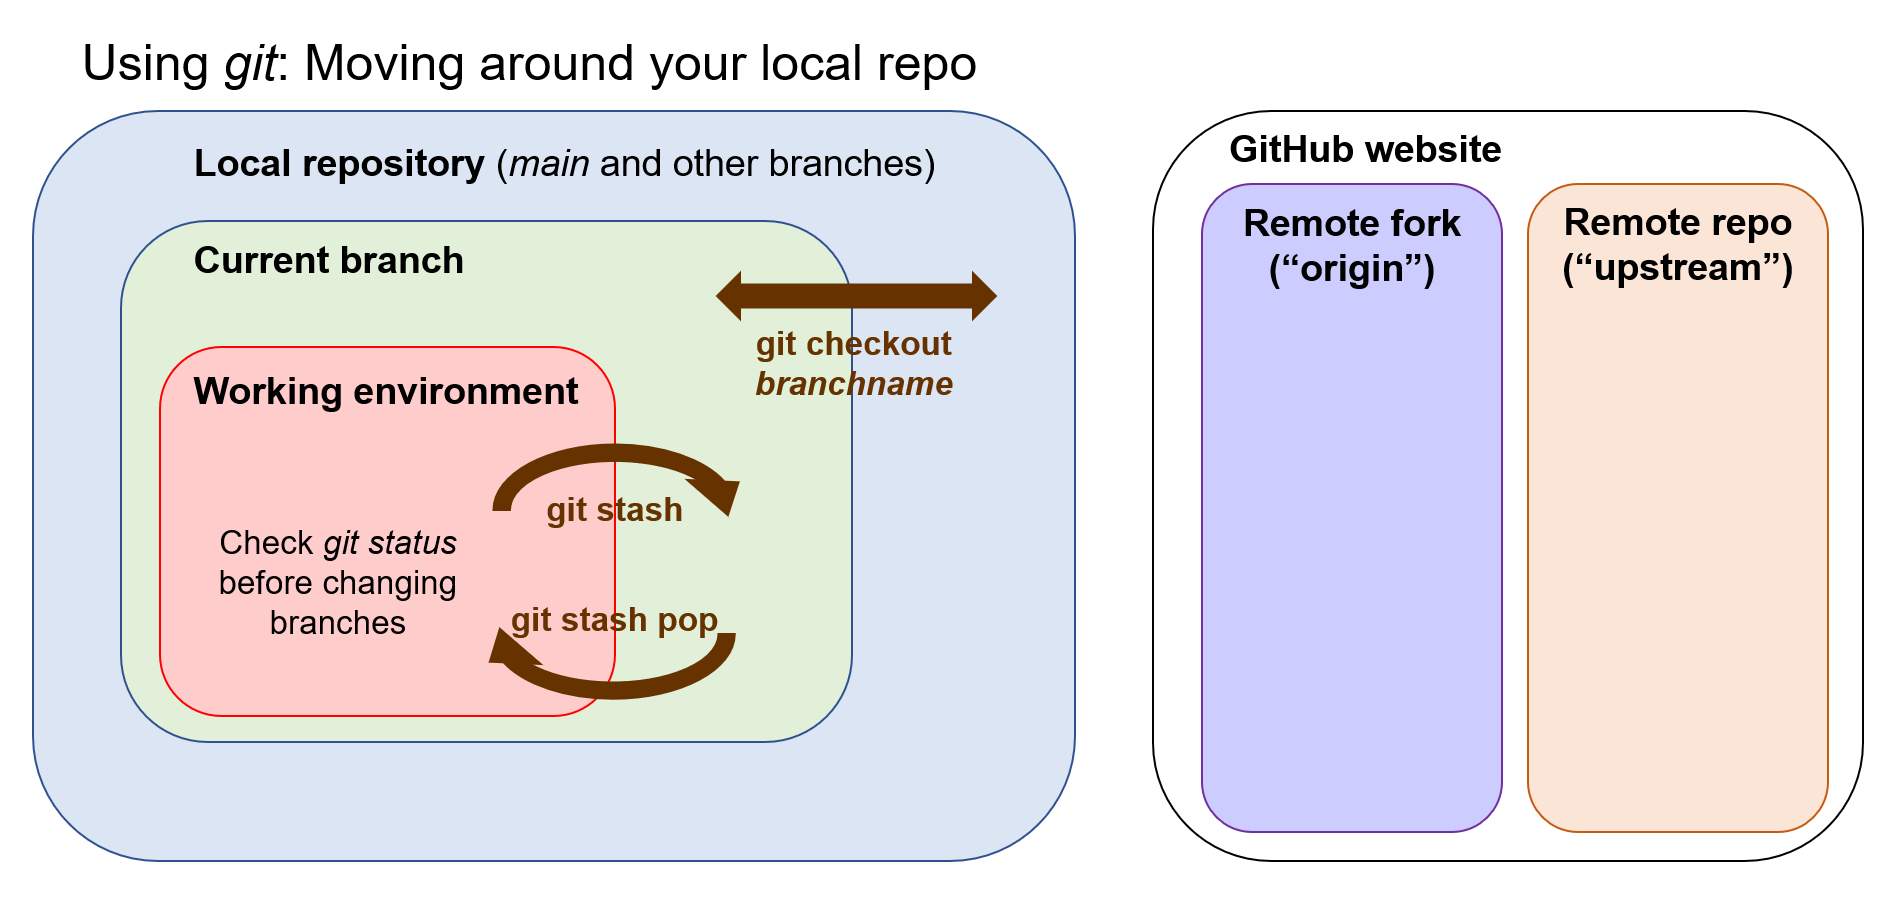
A check of git status in the terminal window shows that tutorial-notebook.ipynb has indeed been modified in your working directory, but these changes have not been staged or committed.
(notebook) jovyan@jupyter-adelman:~/ecco-2024$ git status
On branch test_changes
Changes not staged for commit:
  (use "git add <file>..." to update what will be committed)
  (use "git restore <file>..." to discard changes in working directory)
        modified:   book/tutorials/example/tutorial-notebook.ipynb

no changes added to commit (use "git add" and/or "git commit -a")
To put it another way, the HEAD “reference pointer” for the current branch is still pointing to the notebook before it was changed. If we leave this branch and move back to main or another branch, the changes that you have made could in theory disappear. (In practice, git is very good about warning you and not letting you make mistakes like this.) So before we leave this branch we can “stash” our working directory changes, so we can restore them when we return.
(notebook) jovyan@jupyter-adelman:~/ecco-2024$ git stash
Saved working directory and index state WIP on test_changes: bdc8fed Merge remote-tracking branch 'origin/main'
The state of the working directory has been reset to HEAD, but the changes you were just working on have been stored. Now it is safe to leave the branch (you can check git status to be sure). Let’s go back to the main branch:
(notebook) jovyan@jupyter-adelman:~/ecco-2024$ git checkout main
Switched to branch 'main'
Your branch is ahead of 'origin/main' by 2 commits.
  (use "git push" to publish your local commits)

(notebook) jovyan@jupyter-adelman:~/ecco-2024$ git status
On branch main
Your branch is ahead of 'origin/main' by 2 commits.
  (use "git push" to publish your local commits)

nothing to commit, working tree clean
You can see that the main branch doesn’t have any of the changes we made on the other branch. You can open up tutorial-notebook.ipynb to verify this.
Now return to the test_changes branch:
(notebook) jovyan@jupyter-adelman:~/ecco-2024$ git checkout test_changes
Switched to branch 'test_changes'
(notebook) jovyan@jupyter-adelman:~/ecco-2024$ git status
On branch test_changes
nothing to commit, working tree clean
Let’s restore the stashed changes to our working directory:
(notebook) jovyan@jupyter-adelman:~/ecco-2024$ git stash pop
On branch test_changes
Changes not staged for commit:
  (use "git add <file>..." to update what will be committed)
  (use "git restore <file>..." to discard changes in working directory)
        modified:   book/tutorials/example/tutorial-notebook.ipynb

no changes added to commit (use "git add" and/or "git commit -a")
Dropped refs/stash@{0} (69b55857c19738e45c134e447b19febaf22aa970)
And now we can see our changes again.
Updating your repo with changes from upstream#
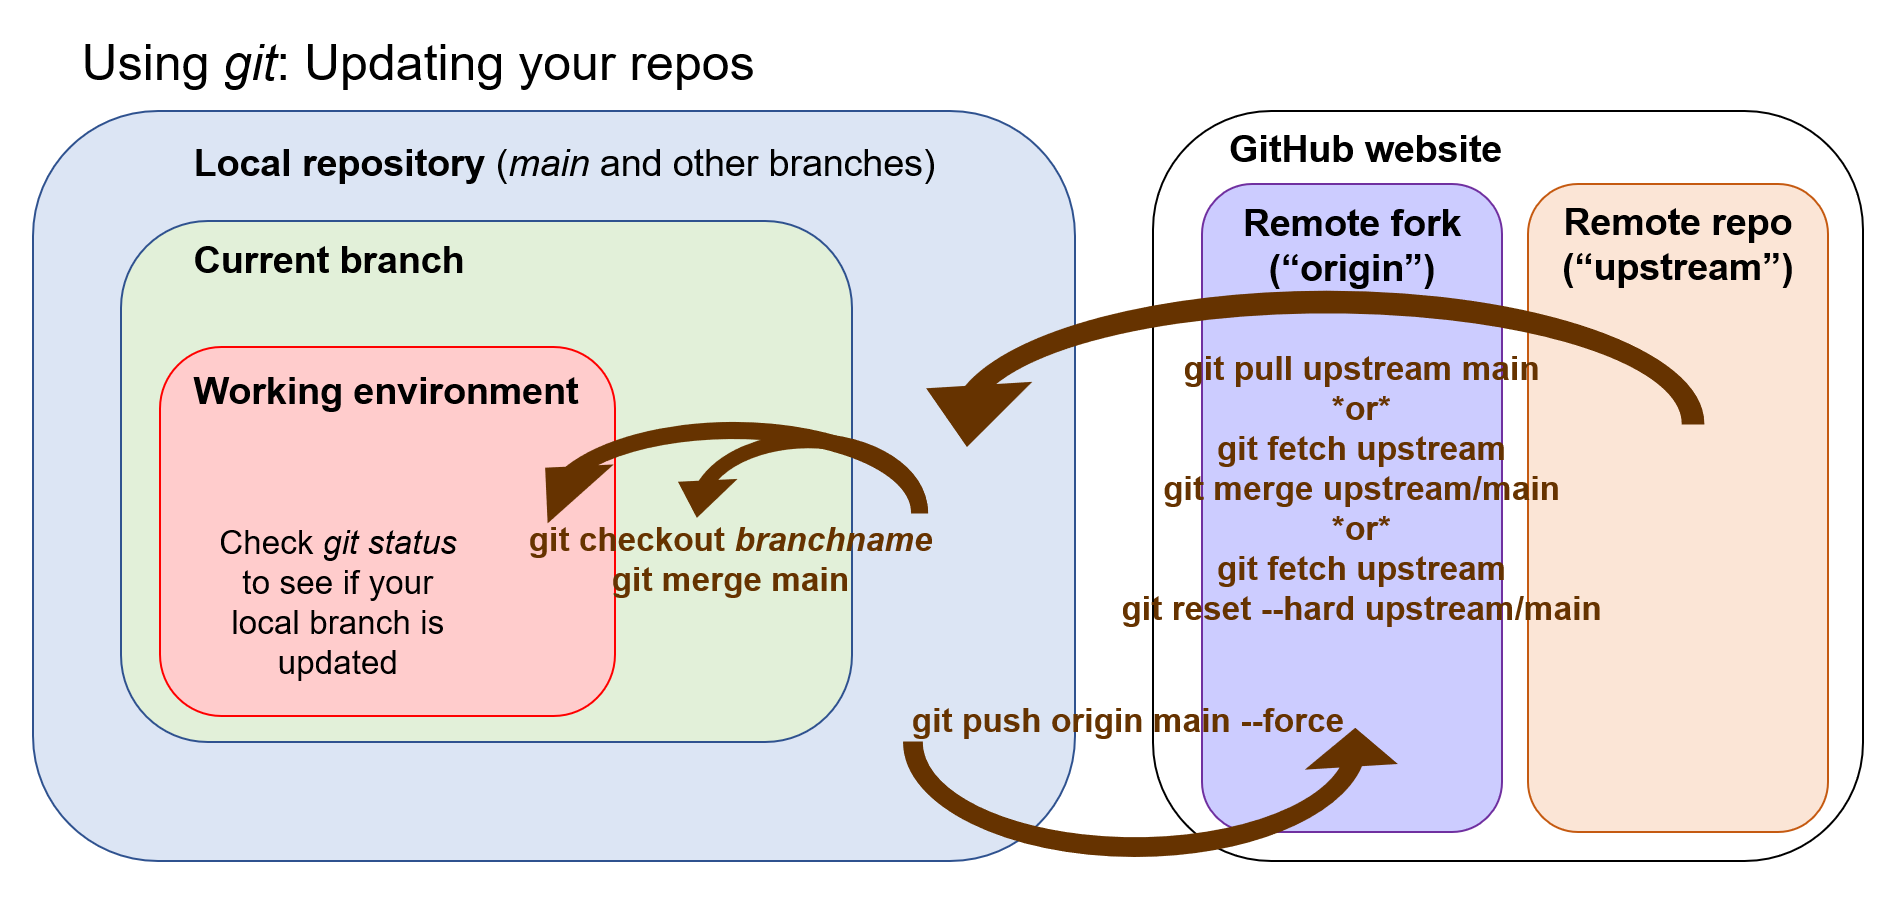
While you are working, other contributors may be merging their changes into the shared upstream repo. If you and other contributor(s) are working on the same file, then you may have a merge conflict between the two sets of changes. It’s best to update your local repos from the remote before pushing your own changes…if you do have a merge conflict, these are easier to work out locally.
Updating main with upstream changes#
Here we demonstrate three ways of updating your local repos with remote changes:
git pullgit fetchand thengit mergegit fetchand thengit reset --hard
The first two methods are essentially the same. While the first method is simpler, the second can be useful if you want to “fetch” a record of the changes to your local machine first, and then merge later (e.g., when you may not have an Internet connection). The last method is different in that it will overwrite the local branch with the remote; this can result in cleaner updates but local work can potentially be lost, so use with caution.
Note:
git pullandgit mergewill both attempt what is called a fast-forward merge, but this is only possible if updated commits from the remote branch can be smoothly replayed on the local branch. If not, there are other types of merges that involve a specific commit dedicated to the merge.
git pull#
Assuming you already added the upstream repo as a remote, you can pull from the main branch at the upstream repo. To pull to your local version of the main branch, you first need to check out main if you are not already on it.
(notebook) jovyan@jupyter-adelman:~/ecco-2024$ git checkout main
Switched to branch 'main'
Your branch is ahead of 'origin/main' by 2 commits.
  (use "git push" to publish your local commits)
(notebook) jovyan@jupyter-adelman:~/ecco-2024$ git pull upstream main
Enter passphrase for key '/home/jovyan/.ssh/id_ed25519':
[!NOTE] If you get an error message when using your SSH key such as
WARNING: UNPROTECTED PRIVATE KEY FILE!, then it means the permissions for your private key are too open. You may keep getting this message periodically as OSS seems to reset the permissions on it periodically for some reason. This can be resolved by making your private key read-only by you (the owner of the file):chmod 400 ~/.ssh/id_ed25519
When invoking git pull or git merge, the terminal window may show a “merge commit” message window which looks something like
  GNU nano 6.2                                                /home/jovyan/ecco-2024/.git/MERGE_MSG
Merge remote-tracking branch 'upstream/main'
# Please enter a commit message to explain why this merge is necessary,
# especially if it merges an updated upstream into a topic branch.
#
# Lines starting with '#' will be ignored, and an empty message aborts
# the commit.
The uncommented line Merge remote-tracking branch 'upstream/main' is the merge commit message and can be changed (but does not need to be). When ready to complete the merge, press Ctrl-x to “commit” the merge.
Merge made by the 'ort' strategy.
 book/_toc.yml                                         |   1 +
 book/tutorials/pcluster/Run_MITgcm_on_P-Cluster.ipynb |  10 ++++++++-
 book/tutorials/pcluster/example.bashrc                |   7 ++++++
 book/tutorials/pcluster/pcluster-login.ipynb          |  36 +++++++++++++++++++------------
 book/tutorials/pcluster/reproducing_v4r4.ipynb        | 110 ++++++++++++++++++++++++++++++++++++++++++++++++++++++++++++++++++++++++++++++++++++++++++++++
 book/tutorials/pcluster/run_script_slurm.bash         |  75 ++++++++++++++++++++++++++++++++++++++++++++++++++++++++++++++++
 book/tutorials/pcluster_tutorial_index.md             |   1 +
 7 files changed, 225 insertions(+), 15 deletions(-)
 create mode 100644 book/tutorials/pcluster/reproducing_v4r4.ipynb
 create mode 100644 book/tutorials/pcluster/run_script_slurm.bash
git fetch + git merge#
Alternatively you can do the equivalent of git pull in two steps by fetching changes on the upstream repo first, and then merging:
git checkout main
(notebook) jovyan@jupyter-adelman:~/ecco-2024$ git fetch upstream
Enter passphrase for key '/home/jovyan/.ssh/id_ed25519':
(notebook) jovyan@jupyter-adelman:~/ecco-2024$ git merge upstream/main
From github.com:ECCO-Hackweek/ecco-2024
 * branch            main       -> FETCH_HEAD
Already up to date.
git reset –hard#
git pull and git merge will work smoothly if the history of the remote branch can be cleanly added to that of the local branch. If this is not possible, merges (while still manageable) can be a little messier. One way to handle this is that you use the main branch of your local repo as a mirror of the upstream repo, and then work out any conflicts with your topic branches locally. A hard reset of your local main to the upstream main will force your local main to match the upstream version.
(notebook) jovyan@jupyter-adelman:~/ecco-2024$ git checkout main
Already on 'main'
Your branch is ahead of 'origin/main' by 13 commits.
  (use "git push" to publish your local commits)
(notebook) jovyan@jupyter-adelman:~/ecco-2024$ git fetch upstream
Enter passphrase for key '/home/jovyan/.ssh/id_ed25519':
(notebook) jovyan@jupyter-adelman:~/ecco-2024$ git reset --hard upstream/main
HEAD is now at 4470e10 Merge pull request #42 from owang01/fix_toc
Using git reset --hard will never result in a merge commit, since no merge is happening–the local main or branch is just overwritten by the remote.
Updating origin with changes from upstream (via local repo)#
As the local main has been updated from the upstream repo, git status shows that it is ahead of origin/main, the equivalent branch on your Github fork of the remote repo. To update origin we can use git push with the --force option to override any potential merge conflicts (similar to the --hard option with git reset).
(notebook) jovyan@jupyter-adelman:~/ecco-2024$ git status
On branch main
Your branch and 'origin/main' have diverged,
and have 10 and 1 different commits each, respectively.
  (use "git pull" to merge the remote branch into yours)

nothing to commit, working tree clean
(notebook) jovyan@jupyter-adelman:~/ecco-2024$ git push origin main --force
Enter passphrase for key '/home/jovyan/.ssh/id_ed25519':
Total 0 (delta 0), reused 0 (delta 0), pack-reused 0
To github.com:andrewdelman/ecco-2024.git
 + c383dc5...4470e10 main -> main (forced update)
Merging local main to a local topic branch#
In a linear workflow, you would not need to merge the main branch to a topic branch; instead you would create a new branch from the latest version of the upstream repo, commit your changes to the topic branch quickly, and push them to the remote repo before any potential merge conflicts can occur. But in a collaborative workflow environment, this may not always be possible. So it is good to have the ability to merge updates from other contributors to your topic branch and working directory, especially where they might affect your code development.
After having pulled/merged changes from remote into our local main, we can merge those changes into the topic branch:
git checkout test_changes
(notebook) jovyan@jupyter-adelman:~/ecco-2024$ git checkout test_changes
Switched to branch 'test_changes'
Your branch is up to date with 'origin/test_changes'.
(notebook) jovyan@jupyter-adelman:~/ecco-2024$ git merge main
A merge commit page may open again. The message can be edited or not. Press Ctrl-x to exit the page and finalize the merge commit.
Merge made by the 'ort' strategy.
 book/_toc.yml                                         |   1 +
 book/tutorials/pcluster/Run_MITgcm_on_P-Cluster.ipynb |  10 ++++++++-
 book/tutorials/pcluster/example.bashrc                |   7 ++++++
 book/tutorials/pcluster/pcluster-login.ipynb          |  36 +++++++++++++++++++------------
 book/tutorials/pcluster/reproducing_v4r4.ipynb        | 110 ++++++++++++++++++++++++++++++++++++++++++++++++++++++++++++++++++++++++++++++++++++++++++++++
 book/tutorials/pcluster/run_script_slurm.bash         |  75 ++++++++++++++++++++++++++++++++++++++++++++++++++++++++++++++++
 book/tutorials/pcluster_tutorial_index.md             |   1 +
 7 files changed, 225 insertions(+), 15 deletions(-)
 create mode 100644 book/tutorials/pcluster/reproducing_v4r4.ipynb
 create mode 100644 book/tutorials/pcluster/run_script_slurm.bash
(notebook) jovyan@jupyter-adelman:~/ecco-2024$ git status
On branch test_changes

nothing to commit, working tree clean


